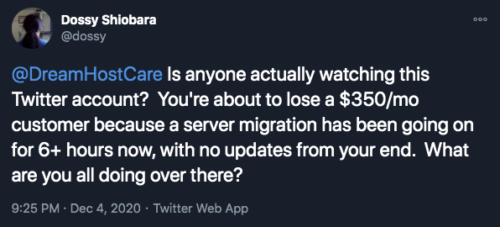
Yesterday, a client of mine was having their DreamHost dedicated server migrated to a new dedicated server because the one they are on intermittently becomes unresponsive at 8pm ET, seemingly at random.
DreamHost’s diagnosis is that the server is on a Linux kernel version that is supposedly causing this, and their recommended solution to the problem isn’t to just upgrade to a kernel that doesn’t have this problem, which would be trivially simple, but to upgrade the entire operating system and migrating to a new dedicated server.
As a person who manages servers for a living, I get it: it can suck having to support old stuff sometimes. The old server is on Ubuntu 14.04.6 LTS, which is quite old at this point, but isn’t due to reach End of Life until April 2022. The new dedicated server they’re moving us to is only on Ubuntu 18.04.5 LTS, which isn’t even the newest Ubuntu at this point, which would be Ubuntu 20.04.1 LTS. Still, any opportunity to force a customer to do a major OS upgrade because the service you’re providing is failing intermittently, I suppose if you don’t give a shit about your customer, you make them do it.
There’s only four small sites being hosted on this server.
There are a combined total of 103.3 GB worth of files, and 7.5 GB worth of MySQL data. These numbers might seem large by year 2000 standards, but in 2020, this is trivially small; it can all fit comfortably in RAM on any modern server, or stored on a modern iPhone.
Transferring this from one server to another over a 1 Gbps link shouldn’t take more than 19 minutes, and less than 2 minutes on a 10 Gbps link. Migrating from one server to another shouldn’t take more than 30 minutes, tops, and that’s if you’re a Neanderthal and type with your fucking elbows.

Thinking that this should be a quick and easy migration, we requested the migration back on October 28th, asking for a date and time when the migration could be done. On October 30th, DreamHost responds saying the data center team would need to do some prep, and that they’d let us know when they could schedule the upgrade, “likely early next week.”
Apparently, “early next week” in DreamHost-speak takes over a month.
Fast-forward a month, and on November 28th, I send a follow-up message asking what the status is with our request. Four days later, on December 2nd, I get a response saying they’re ready to go. I respond on December 3rd, requesting the soonest available time slot, because at this point I just want to get this over with. I get a response late that night saying that they’ll schedule the upgrade for the next day, December 4th, at 11am PT/2pm ET. Fantastic, we’ve got a plan!
The time comes, it’s 2pm ET, and I’m sitting here, with the Cloudflare panel open in one tab, the DreamHost panel open in another, and the sites all lined up in 4 other tabs, ready to pull the trigger on changing the DNS to point everything at the new server to minimize whatever downtime I can. I’m prepared.
At 2:57pm, I get an email from DreamHost saying that they’re only now starting the migration. 🤦 Okay, fine, whatever. The email says I’ll receive an automated email once the upgrade is done. Cool, let’s get this over with!
… time passes …
… and some more time passes …
… I’m starting to wonder if my spam filter ate their automated email …
… and the sites still haven’t been migrated …
At 7:26pm, I send an email pointing out that at least one of the sites is down because it can no longer connect to its database. I point out that I haven’t gotten an email that the migration has completed yet, so either their process has failed or they have seriously taken four and a half hours, so far, to complete a migration that should have been 30 minutes, tops.
At 8:37pm, having gotten no response to my earlier email, and the site still being down, I send another email, asking for an update. How much longer could this possibly take?
Getting no responses to my emails, I decide to give DreamHost support’s “live chat” a shot. I queue up at 9:17pm, and eventually get connected to a person at 9:27pm. I ask for a status update with our migration. I notice that while I was waiting in queue, an email arrived at 9:16pm saying their upgrade process failed and had to be restarted.
Are you fucking kidding me?
I stay on the live chat to try and get progress updates, and see if there’s any chance this is going to actually get done tonight. Sadly, at 10:19pm, I’m told that the migration process has failed again, and that the tech who was doing it will revert part of the migration to point the sites at the databases on the old dedicated server to bring the sites back online, and that they’ll come back to this on Monday.
At 10:42pm, I’m informed that the sites should be back online and that and that there’s nothing more that will be done this evening. I confirm that the sites are back online, and end the chat.
***
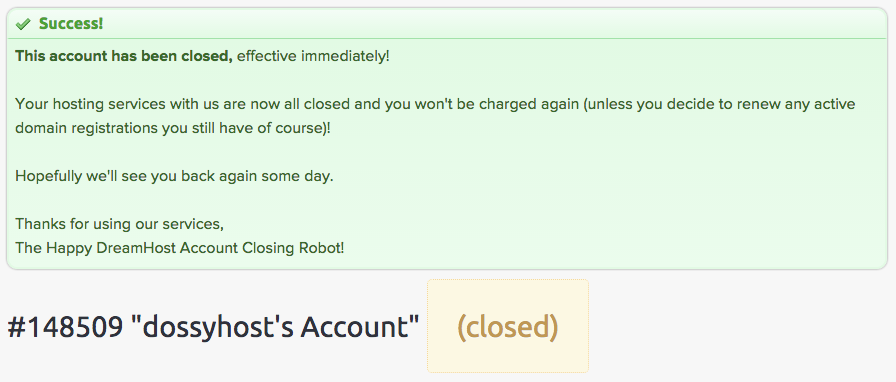
I was a long-time DreamHost customer, myself, since 2006. But, after they changed their service offering in 2015, I had enough and closed my account.
At that time, I was just happy enough to leave and leave it at that. But now, 5 years later, seeing that the DreamHost experience has continued to get worse over time, I’ve decided that not only am I not going to give them my business, I’m not going to have my clients give them their business, either.
If you’re currently hosted at DreamHost and unhappy and want to move away, but haven’t because you’re either uncomfortable moving your site by yourself, or you’ve tried hiring someone in the past to do it and they failed, I want to help move you.
Contact me and tell me about your DreamHost experience, and I’ll see to it that you’re moved to better hosting.


Latest comments